
Paint the sky with clouds. | |
| HOME TG2 Gallery Guides Downloads Clouds |
Painting in the sky.
While it is fairly easy to figure out how to use the Painted Shader to mask areas where a Surface Layer is applied or to control the distribution of a population, it is not so simple to use it to paint in the sky to control the placement of clouds. The first two are simpler as the Painted Shader is applied directly to the ground where it will apply. You can use a camera with a high view point to paint onto the ground below the areas where you want clouds but this is not always practical and it can be difficult to position clouds accurately. It would be much simpler if you could leave the camera where you have it positioned in the scene and paint onto the sky. This would allow clouds to be "painted", just where they are wanted. The problem is that the Painted Shader needs a surface to be painted onto and when the camera is looking at the sky the only surface visible is usually the Background which is typically millions of units distant and therefore of little use. However there is a solution.
In general terms the solution is quite simple and obvious once you think about it: Place a Plane object at the same height as your clouds and paint onto that. The steps involved are nothing too complicated but there are a couple of little points that need explanation. This guide will take you through the steps and let you paint clouds into your sky.
Getting started.
Let's start with a simple scene, nothing special just the default planet and atmosphere with a population of Terragen's integral grass clump object and another of trees; the Grand Fir provided free by Greenworks and available from the Planetside website: Here.
Rather than spend time going through the steps required to reach this stage, which would need to be quite detailed if you were to start with exactly the same scene as that pictured right. I have provided the basic .tgo Terragen 2 scene file and will be assuming that you have downloaded it and are using it as your starting point.
Download the scene file HERE.
As it is unlikely that you will have saved the tree model in exactly the same relative place that I do Terragen will probably generate an error when you first load this scene file. If you do get an error switch to the Objects tab, locate the tgo loader for the tree (Pop CL02a_Grand_Fir.tgo/ CL02a_Grand_Fir.tgo), from the list; click the browse icon to he right of the file name and navigate to the location where you have the model saved, save the scene. There is no absolute need to start with this scene but it will make the following steps easier as you will be able to enter the values given and obtain the same result as described.
Adding a cloud layer.
Before we can use our Painted Shader to mask where clouds will appear in our scene we will first need to add the cloud layer.
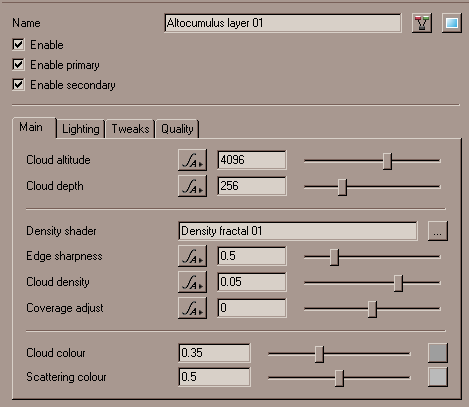 Switch to the Atmosphere tab and add a 3d Altocumulus layer. At this stage we want a fairly dense overall cloud coverage with small variations and a scattering of little gaps. From the Main tab of the properties panel make the following changes:
Cloud altitude = 4096
Cloud depth = 256
Edge sharpness = 0.5
Cloud density = 0.05
See the example image to the left. There is no need to change any of the other settings at this stage.
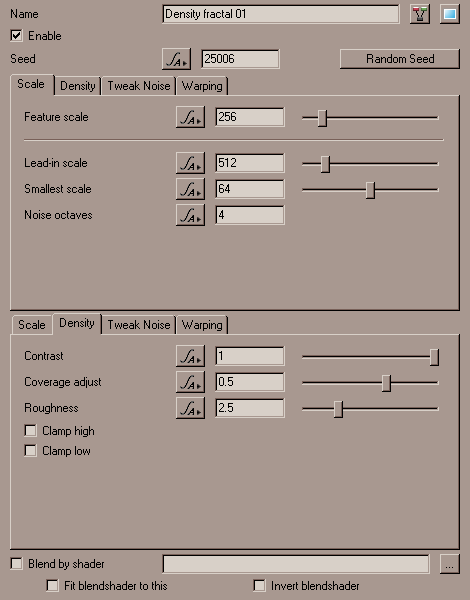 Now we need to make a few changes to the cloud Density Fractal settings; open the properties panel for the Density Fractal associated with your cloud layer. We need to make the following changes:
Feature scale = 256
Lead-in scale = 512
Smallest scale = 64
Now switch to the Density tab:
Coverage adjust = 0.5
Roughness = 2.5
Refer to the composite image, left; if you are not sure. You can leave all the other settings at their defaults.
Note: If you want to produce exactly the same result as I did you can change the seed value to 25006 but he cloud layer we are making is fairly even so although there will be small differences if you use a deferent seed value they will not significantly affect the final result.
If you want to see what your cloud layer looks like now is a good time to make a test render; it may also be a good time to save your work, giving it an incremental file name is probably a good idea too i.e. paintsky02.tgd
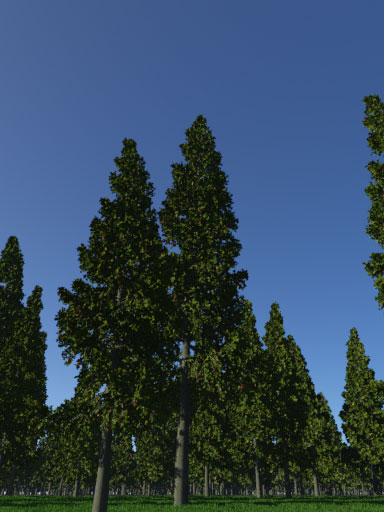
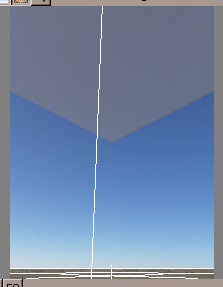
 To save time and get a clearer view you can temporarily turn off the trees: Switch to the Objects tab, find the grand fir population and clear the "Active" check box. If you do this and then render you should get something like this (Right).
This may not look much like what we want but remember, we will be using the Painted Shader to partially "Reveal" these clouds in the areas we choose, so they will look different in the final image.
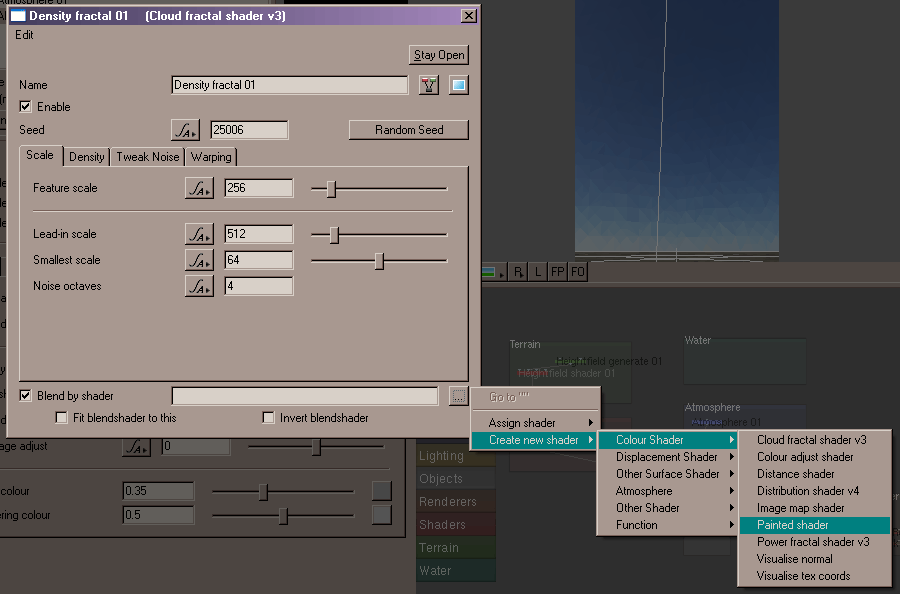
>Before we can move on the real focus of this guide; using a plane to paint in the sky, there is one final thing we need to do to the cloud layer. Return to the cloud Density Fractal properties panel, check Blend by shader. There is a text field to the right of the check box and to the right of that an expandable menu button. Click this and choose: Create new shader / Colour shader / painted shader. The image below shows this, he background has been darkened to show the steps more clearly. Notice also that when the Blend by shader check box is ticked the cloud layer disappears from the 3D preview.
Adding a plane object.
We are now ready to add a plane object to our scene, this will be placed at the same level as our cloud layer and will give us a surface 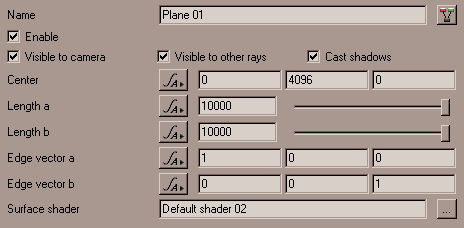 to paint onto when we come to edit the Paint Shader we have just created. Switch to the Objects tab and add a single plane object to the scene; by default the new plane object is small and centered at the origin, (ground level). The first thing is to raise it to the level of our cloud layer, we set the Cloud altitude to be 4096 so we need to set the second value of the three values controlling the position of the centre of our plane to be 4096 also. The plane is still only a small I metre square so set Length a and Length b to 10000 (10 Kilometers); see the example image, left. A 10 Km square plane will not cover the entire sky but is large enough to be seen and positioned, its size can be increased later as required.
If you look at the 3D preview you will see no change, you would expect to see at least part of the new plane object but it does not appear to be there. This is because, in common with the disc object, the plane displays no bounding box and is a single sided surface, we are currently looking at so not seeing the "Wrong" side of our plane.
In order to make our plane visible from the viewpoint we are using we need to flip the plane so that we are looking at the "Front", visible side. 
 The orientation of a plane in 3D space is controlled by the two, three component values Edge vector a and Edge vector b. With the proper setting of these values the plane can be oriented at any angle, and rotation, it can even be skewed but we don't need that for our purpose all we need to do is turn it over. To do this all we need to do is reverse one of the edge vectors, look at the two Edge vector values and replace one but not both of the ones with a minus one and the plane will become visible in the 3D preview. In the example I have replaced the one in the Edge vector a value with a minus one.
Now the plane is visible we are almost ready to paint onto it however as it is it is not really big enough and doesn't cover enough of the sky. You could simply make it bigger by increasing the Length a and Length b values or do what I did and move the centre as well. I set the following:
Center = 16000, 4096, 16000
Length a = 32000
Length b = 32000
This is a good time to save your work.
Painting in the sky.
Before we start painting it is a good idea to make the Paint shader controls visible. 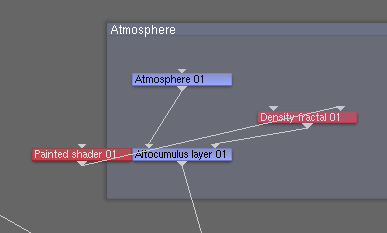 You can either work your way to the Paint shader by switching to the Atmosphere tab, selecting the cloud layer, opening the Density fractal and finally opening the blend shader but it is much quicker to locate the node for the Paint shader in the node network and double click it, Terragen isn't always very tidy when it adds nodes to the network so you may want to take the opportunity to move the Paint shader node to a tidier location. Which ever way you open it click the Stay open button in the top right corner of the Paint shader properties panel so that it stays readily available while you are painting.
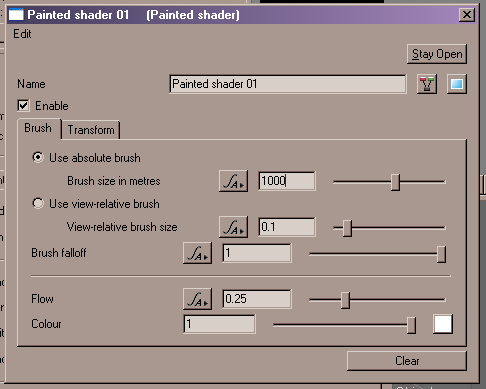 The paint shader properties panel gives you controls which allow you to change the size and flow intensity of the paintbrush, the colour of the paint etc.
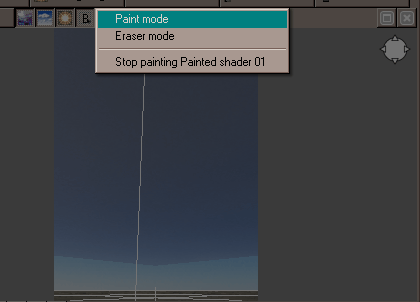
Before you start to paint allow the 3D preview to render completely then pause it. Now use the paint shader controls located above the 3D preview to first select the paint shader and then to enter Paint mode. The images below show these actions, the backgrounds have been darkened to show the steps more clearly.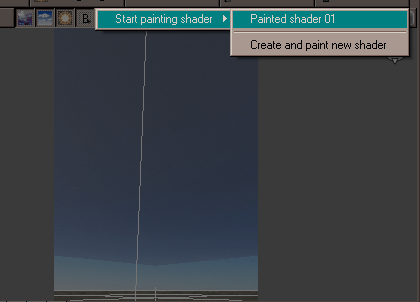
You are now ready to paint, if you move the mouse pointer over the 3D preview you will see that it changes to a broken yellow circle, this is your paintbrush. With the paintbrush over the plane object in the 3D preview use the left mouse button to paint the areas where you want clouds to appear. 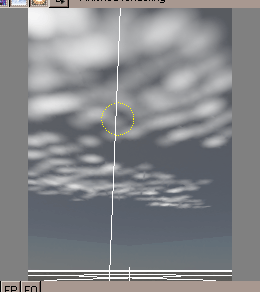 Remember that you can change the size, intensity of flow and falloff of the paintbrush from the Paint shader control panel which we opened earlier, depending on how your windows are arranged this may be behind the main Terragen window and hidden. The more paint you apply the denser your clouds will be. If you paint too much you can put the paint shader into Erase mode and erase it. You can paint any pattern you like but for this example I painted the pattern shown, left.
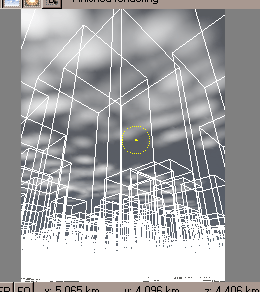 If the positioning of the clouds relative to objects in your scene is important you can make the instances of a population visible in the 3D preview. This does slow things down a bit but could be good for fine tuning.
When you are happy with your painting use the Painted shader comtrol menu to Stop painting and un-pause the 3D preview. Before you render the scene switch to the Objects tab and find the plane object. 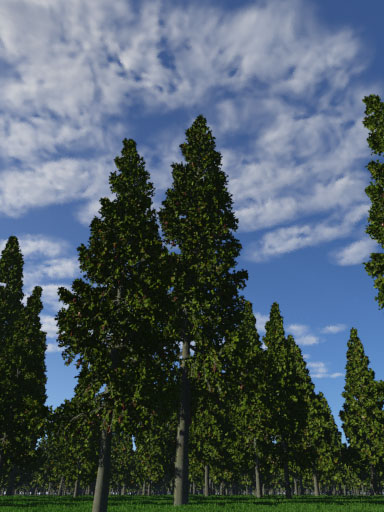 Clear the Enable check box in its control panel and render your scene. If you disabled the trees earlier to get a better view of the cloud layer remember to enable them again if you haven't done this already. If you painted a pattern similar to mine your final scene should look something like this.
If you are unhappy with your clouds re-enable the plane object and return to the Painted shader and make modifications as required. Unless you are absolutely sure you are never going to change your Painted shader again keep the disabled plane object in the scene rather than deleting it altogether.
When you are happy with the final result save your work.
Additional notes.
Quality settings: If you started with my example scene you may have noticed that the number of atmosphere samples have already been increased to 32, unless you make significant changes to the scene this should be adequate. The number of samples needed for the cloud layer is a little more difficult to define as it will depend on the distribution and density you created with your Painted shader but if you are using the settings for the cloud layer described in this guide 128 samples should be more than enough. The example final render uses 96.
Bigger clouds: The Painted shader will allow you to paint areas outside the 3D Preview but this is unpredictable and depends what else is under the mouse pointer. If you need clouds to extend beyond the visible area you can temporarily increase the viewing angle of the camera so that more of the sky is visible. You can also pan the 3D preview to look at different areas of sky but anything painted from a changed viewpoint will not share the original relationship to the scene camera so may not appear as expected. If you want to go a long way outside the visible area of the example you will also need to increase the size of the plane object.
Multiple cloud layers: If you want to use several Paint shaders to control multiple cloud layers you can either use one plane object, moving it up and down so that it coincides with the cloud layer that you want to edit the Paint shader for. Or more simply create several planes one for each cloud layer and enable them as required.
Top of Page